Peanut Drawing: Step-by-Step How to Art Lesson with Video
Inside you’ll find an easy peanut drawing lesson with step-by-step instructions and a PDF. Perfect for your elementary art classroom.

Peanut Drawing Art Lesson

This peanut drawing lesson is perfect for the elementary art classroom because it uses simple shapes and curved lines, making it easy for all students to follow, even those who might lack confidence in their drawing skills.
The steps are broken down clearly, so you can model each one and keep your class on track without having to create your own demo from scratch. The repetition of lines helps reinforce fine motor skills, while also introducing students to the idea of visual texture — without needing advanced techniques.
It’s a flexible project that works well for seasonal themes like fall or as part of a food or nutrition unit. And because it only requires basic supplies like pencils, paper, and crayons, it’s a great low-prep option that won’t stretch your budget.
Your students will love the unexpected subject matter, and you’ll love how quick and easy it is to prep and teach.
Peanuts in Art and Visual Culture
While peanuts may not be a traditional subject in classical fine art, they offer a fun and unexpected way to introduce students to the idea that anything can be turned into art — even a humble snack.
This project is a playful entry point into observational drawing, encouraging students to really look at everyday objects and break them down into simple shapes and lines. Scientific illustrators and still life artists have done this for centuries — drawing fruits, vegetables, and natural forms with careful attention to detail.
You can also connect this lesson to the Pop Art movement, where artists like Andy Warhol transformed ordinary items into iconic works of art. Just like Warhol made soup cans and Brillo boxes famous, your students are turning peanuts into subjects worthy of artistic attention.
For a fun twist, mention Mr. Peanut, the monocled mascot of Planters, as an example of how artists and designers use real-world objects to create characters and branding. It’s a great way to show students that art is all around them — even in their lunchboxes!
A preview of Peanut Drawing Tutorial

Peanut Coloring Page

Peanut Butter and Jelly Materials List


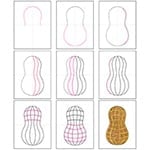
Peanut Drawing Step-by-Step Instructions
Time needed: 30 minutes
How to Draw a Peanut
- Draw the top part of the outer shell.

- Draw the bottom part of the outer shell.
- Draw the single curved line on the right side.
- Add two double sets of curved lines on the right side.
- Add two double sets of curved lines on the left.
- Draw the single curved line on the left.
- Draw the three sets of double curved lines on top.
- Finish with five sets of double curved lines on the bottom.
- Trace with pencil so you can see the squares, and color.


Already subscribed to “The Daily Draw”?
Great, then use the button below to get your free Peanut Drawing tutorial. And thanks for wanting to bring more step-by-step, no-prep art lessons to your classroom!