How to Draw King Tut: Easy, Step-by-Step Art Lesson for Kids
Below you’ll find an easy step-by-step tutorial for how to draw King Tut. It offers lots of good symmetrical drawing practice.

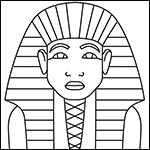

Drawing of King Tut

Why Learn How to Draw King Tut?
Students can get some good practice drawing faces, when they draw King Tut’s mask. The features are bold and simple, without a lot of detail like eyelashes, etc. Only a few clean lines are needed to show his handsome eyes, nose and mouth.
King Tut’s headwear is also a great example of not one but two types of symmetry. The top has stripes radiating out from his face (radial symmetry) and the sides have matching stripes (mirror symmetry). Students that want to have a very balanced drawing of King Tut will need to draw their stripes carefully. It may take extra time, but the finished eye-pleasing symmetrical look is well worth it!
About King Tut
King Tut – short for King Tutankhamun, was a pharaoh during Ancient Egypt’s New Kingdom. He’s mostly known for his famous tomb and the supposed curse that followed those who opened it. As a pharaoh though, his reign was not that remarkable, and it lasted less than a decade.
Tutankhamun was only 18 when his life ended and his golden coffin was buried in a tomb in the Valley Of The Kings, surrounded by 5,000 priceless treasures.
Preview of the Step by Step King Tut Art Lesson

Materials


How to Draw King Tut Step by Step
Time needed: 1 hour
How to Draw King Tut
- Make guidelines. Draw the head.

- Begin the headdress.
- Draw symmetrical bottom curves.
- Finish with straight lines. Draw the features.
- Add ears and lines on the top headdress.
- Add matching horizontal lines.
- Draw beard and fill with Xs.
- Draw the collar to finish.
- Trace with black marker and color.